In this article we'll explore how to combine your own customer data with a ChatGPT prompt and showing the results in Zendesk next to a ticket.
We'll do this using a no-code/low-code data pipeline tool called FactBranch and will show the results in FactBranch's Zendesk app so your agents can see the outputs when they open a ticket. You can also follow this video that walks you through the setup from start to finish.
Here is everything we'll talk about in the article:
If you've used ChatGPT before, you'll know that it's a bit like an assistant. If you give it the text of an article and a few questions, it will answer your questions. Or if you ask it to summarize the article, it will dutifully summarize the article. You can also give it a bunch of structured data (for example in the JSON format) and ask it questions about the data.
That's exactly what we can use it for in Zendesk. Here are a few ideas:
FactBranch is a no-code/low-code data pipeline tool to load data, transform data and create graphical user interfaces (GUIs) for support tools like Zendesk. We'll use FactBranch to load customer data from an SQL database. In the next step we'll write a prompt to GPT that includes the ticket text and the customer data we found and have GPT summarize the relevant data into three bullet points.
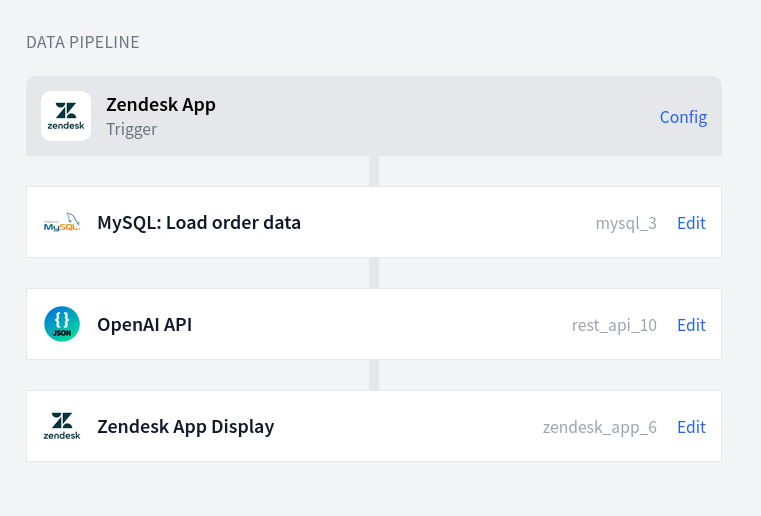 A data pipeline in FactBranch: Load customer and order data from a MySQL
database, ask ChatGPT about the data and display the results in the Zendesk app.
A data pipeline in FactBranch: Load customer and order data from a MySQL
database, ask ChatGPT about the data and display the results in the Zendesk app.
The cool thing about FactBranch in combination with ChatGPT is that you can use FactBranch to look up customer data in your SQL database, your API or your Google Sheet and then include that data in your ChatGPT prompt.
You can even include the ticket text and let GPT write a response that incorporates the customer data you've looked up in a previous step.
To follow this tutorial you'll need 3 accounts:
First, we'll create a new API key in your OpenAI account and save this API key securely to your FactBranch account.
Go to API keys in your OpenAI account and click "Create new secret key". Optionally enter a name for this key and click on "Create secret key". Copy the key you see in this dialog. Then head to the data sources list in your FactBranch account and click "Add data source". Click on "REST API" and select the authentication type "Bearer". Paste the API key you've just copied from OpenAI. Then rename the data source by clicking on "rename" next to "REST API" at the top of the page. Give the data source a name you'll recognize - like "OpenAI API key". Click "Save" to save the new name and click "Save" at the bottom of the page to save the API key.
In FactBranch data pipelines are called flows. A flow is triggered by an event sending data and then consists of a series of nodes that do something with the data.
In our case we want to display data in Zendesk Support. First go to your flows dashboard in FactBranch and create a new flow. Select "Show data in the FactBranch Zendesk app" and you'll see your newly created data pipeline consisting of a trigger and a display node.
Now add a node in which you look up the customer data you'd like to get. We have several tutorials on how to look up data from Google Sheets, MySQL, PostgreSQL, Microsoft SQL Server, Google BigQuery and a generic RESTful API.
If you don't want to look up customer data, you can also skip that step.
Now that you look up customer data, let's create a node that prompts GPT with your prompt and your data via OpenAI's API endpoint.
Create a "REST API" node and on the "Authentication" tab confirm that your data source (and with it your OpenAI API key) was automatically selected. If not, select it manually.
Then return to the "Request body" tab and select "POST" as the request method. Copy/paste the API endpoint you want to use:
https://api.openai.com/v1/chat/completions
Then, copy/paste the following request body as a starting point:
{
  "model": "gpt-3.5-turbo",
  "temperature": 1.0,
  "messages": [
    {
      "role": "system",
      "content": "You translate inputs into Shakespearean english."
    },
    {
      "role": "user",
      "content": "We are creating an API node that prompts GPT - a large language model."
    }
  ]
}
If you click "Run", you should get an output like this:
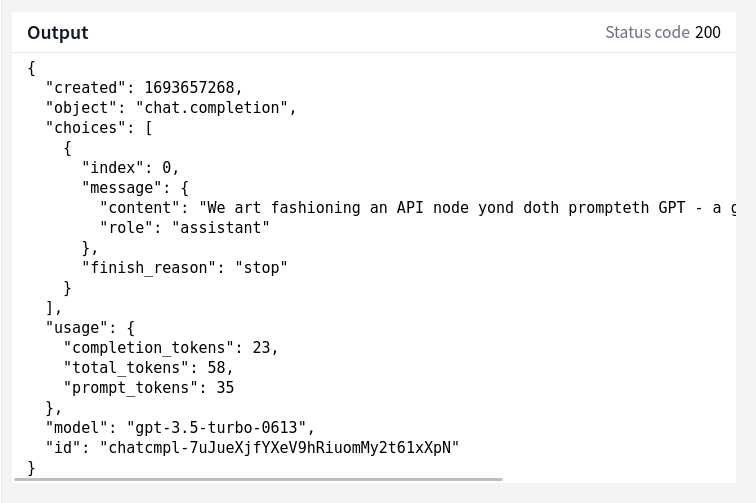
Inside choices[0].message.content you'll find GPT's response to our prompt.
Now let's turn the prompt into something useful and include customer data that we've collected in the previous step.
This prompt is of course only an idea and a starting point for your own use case. But it should give you an idea how to use the system prompt, the user prompt and how to include data.
{
  "model": "gpt-3.5-turbo",
  "temperature": 0.3,
  "messages": [
    {
      "role": "system",
      "content": "Summarize data into 1 to 3 short bullet points that are relevant to the question. Only include data that's relevant to the question."
    },
    {
      "role": "user",
      "content": "Question: $trigger.data.ticket_description.escape_quotes() \n\nData: $nodes.mysql_3.data.escape_quotes()"
    }
  ]
}
Basically in the system prompt we tell GPT what to do ("Summarize data into 1 to 3 short bullet points ...") and provide the user's question itself and the customer data in a user prompt.
Let's dissect the user prompt:
Question: $trigger.data.ticket_description.escape_quotes() \n\nData: $nodes.mysql_3.data.escape_quotes()
$trigger.data.ticket_description addresses data from the trigger (what the
Zendesk app sends to FactBranch) and specifically the ticket's text (its
description).
Because we are inside a JSON string, we have to make sure any
quotes that are inside the ticket_description are escaped, and so we add the
transform function .escape_quotes().
Then we add two newlines: \n\n.
And then we include the customer data that we got from the database and escape
the quotes too: $nodes.mysql_3.data.escape_quotes().
There are many approaches to writing an effective prompt. In my experience shorter prompts work better. If your prompt is detailed and convoluted, GPT sometimes has a hard time figuring out what it should focus on and then ignores important parts of your prompt.
Describe what you want and not what you don't want.
The keyword "bullet points", in my experience, always produces a list of items - each on a new line. Every line starting with "- " or "1. ". This is a conventient way to get short sentences separated by a newline.
Play around with the temperature property. You can set it to a value between 0
and 1 and it's a measure of how consistent or creative the responses are. At 0
the model will return very similar responses to the same prompts. In my
experience for data analysis it's better to pick a lower temperature.
In the example we're using GPT-3.5. It's fast and relatively cheap. If you really want to improve the results and have access to it, use GPT-4. But be warned, it costs over 20 times more than GPT-3.5!
Now that we have a response from GPT, let's show it in a simple app in Zendesk.
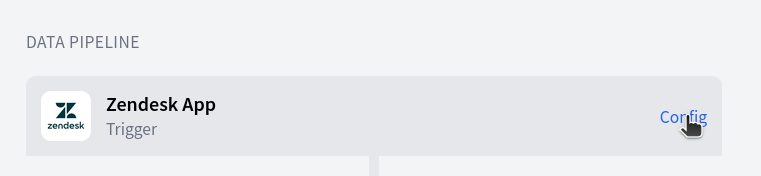
Head to the trigger config page inside the data pipeline in FactBranch and follow the instructions to install the Zendesk app.
 Find the instructions to install the FactBranch Zendesk app on the trigger's
config page
Find the instructions to install the FactBranch Zendesk app on the trigger's
config page
Then return to the data pipeline in Zendesk and open the "Zendesk App Display node". On the top right you'll see the data from the previous node as it was returned by GPT.
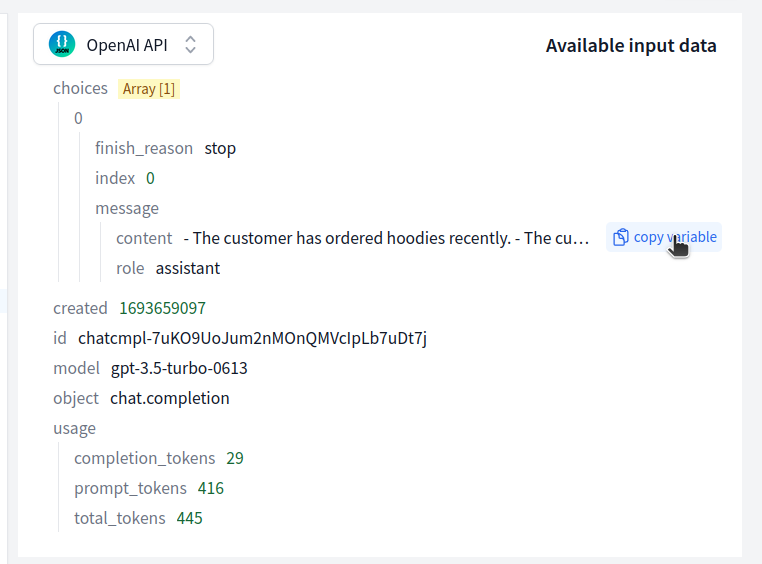
Copy the full variable path from the input data. We'll use this in our template in a minute.
<div class="c_fbzd_item">
  <div class="c_fbzd_item__label">Summary</div>
  <div class="c_fbzd_item__value">
    <ul>
      {% for line in nodes.rest_api_10.data.choices[0].message.content.split("\n") %}
      <li>
        {{ line[2:] }}
      </li>
      {% endfor %}
    </ul>
  </div>
</div>
We use a few tricks here.
We split the message we got from GPT by the newline symbol \n and loop over
each line. Splitting is done by appending the .split("\n") function.
And then, because we asked GPT to return a bullet point list, every line starts
with either "- " or with "1. ", "2. ", etc. And so we get rid of the first two
characters by outputting line[2:].
Once you've done all that and the output panel shows a nice preview, you'll see something like this in your Zendesk tickets:

That's all it takes to task a state-of-the-art AI with analysing your data and showing the results to your agents automatically.
You should always show the raw data alongside the summary or any analysis you let GPT do. GPT is reall good. But sometimes it hallucinates something that's not there.
If you are using this at scale, roll out the Zendesk app to some agents slowly and monitor your costs in your OpenAI account closely. Especially if you use GPT-4 this can get expensive quickly.
There are several limitations to how many requests you can send to the OpenAI API per minute. If you run into issues there, reach out to support@factbranch.com - we're working on a more advanced solution and would love to be in touch with people who use this at scale.
Don't forget to check out our docs to learn more about the templating language to build apps with FactBranch.
Sign up for our newsletter to get our freshest insights and product updates.
We care about the protection of your data. Read our Privacy Policy.